
LOVE WHERE YOU EAT
The kitchen has always been my absolute favorite room in the house. It is said to be “the heart of the home” and in my opinion, should be functional as well as beautiful. However, with that beauty often comes a hefty price tag. When we built our home a little over 9 years ago, we decided immediately that a kitchen remodel was our top priority. To the untrained eye, our kitchen appeared functional but beautiful it was not. One major design flaw was the extremely oversized and awkwardly placed island. Although it seated 6, it was two tiered and had with very little surface area for prepping or eating. Being we spend so much time in our kitchen, my goal was to make it a place we wanted to spend time in. For me, the kitchen had to have ample storage, a great layout and of course most important-be pretty.

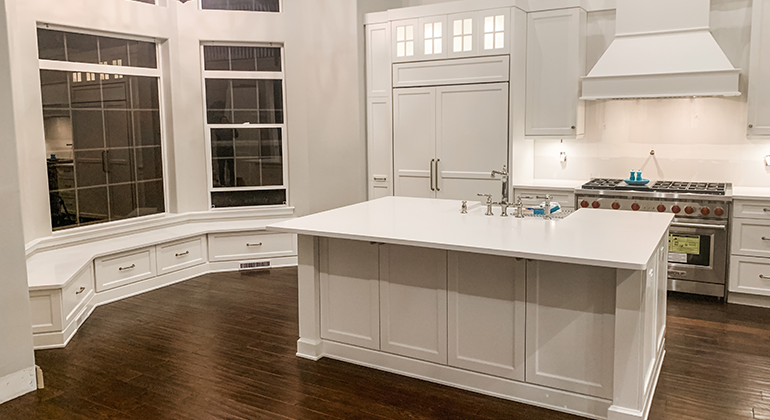
Before (windows weren’t tinted yet)
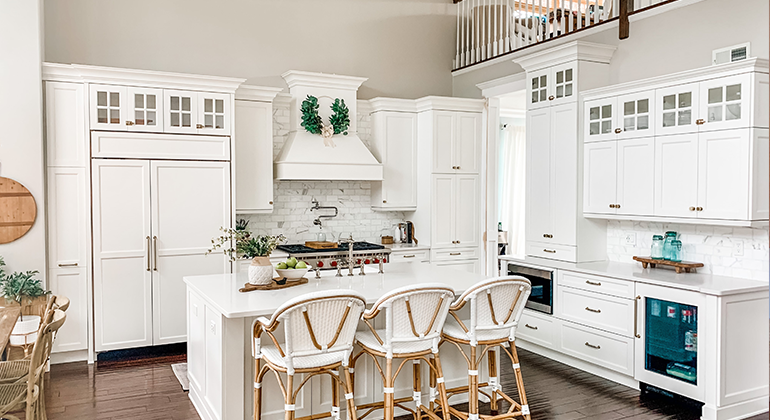
After
WHY REMODEL A “NEW” KITCHEN?
If you’ve ever lived on Long Island, you know how challenging it is to find a home that fits your needs AND wants. This was our third home and the one thing we were sure of was that we didn’t want to renovate any time soon. After searching for many months, we found a semi-custom home builder in a gated community of 127 homes. Although it wasn’t custom, it was still overwhelming selecting flooring, hardware, cabinet colors etc. Some choices were made with the intent to change, whereas others were too expensive or impossible to change later on. We decided to upgrade only the big structural items such as adding a third car garage, recessed lighting and hardwoods floors. The cost to upgrade the cabinets and granite was way overpriced and we weren’t allowed to make changes to the actual layout. So we opted to take the standard builder grade kitchen without all the bells and whistles. If I could offer one word of advice during home renovations it would be-“be patient”. Home takes time.

The design team gave us three standard cabinet choices (espresso, medium brown or light oak) and two granite choices. The kitchen did not come standard with crown molding or a backsplash. Shortly after moving in, we called our previous kitchen designer to come and give us an estimate. He insisted we use the kitchen for a year and figure out what we loved and hated about it. This was great advice except one year turned into 7! I have to say, I am happy that we waited to do it.
DESIGN PLANS
After doing some research on Pinterest, I narrowed down the “must-haves” for my new kitchen. This can be overwhelming because not everything you see in an inspiration photo can work in the space you have. Although I have a good amount of space, I don’t have any two walls that meet at a corner. I quickly learned you have to be realistic with your wishlist and constantly alter your plans based on your needs and your wants. My one non-negotiable was an island that had a large workspace and an area to for my kids to eat breakfast or do homework. In a perfect world, I would’ve preferred my sink to be located under a window; separate from my island. However, the only windows I have in the kitchen are in the breakfast nook. So this wouldn’t work. With the sink in the island, I could still see the family room, the yard and even a glimpse of the pond which made my least dreaded chore more bearable. Another “must-have” was a farm sink in place of my stainless steel double basin sink. In my opinion, the double basin sink was hard to work in and the stainless scratched easily. In the plans, the farm sink ate up a large part of the island. I decided to change the depth (wider wasn’t an option) to gain more overall eating/prep space. I had to be careful not to make it as deep as it was wide because I didn’t want a square shaped island.

CAD drawing of general layout
Some other non-negotiables for my kitchen design was a multi-burner range with at least an oven and a half, a large built-in refrigerator cabinet, a microwave drawer, a mini fridge and a pot filler. It was also important for me to have storage being we didn’t have the space for a walk-in pantry. We incorporated back to back cabinets in the island to store small appliances that we don’t use everyday. I also added a built-in window seat for the dining nook. This made the space feel custom and added more storage for extra plates, cups, table linens and lunchboxes. Lastly, I swapped out bottom cabinet doors for drawers which allowed for better organization.
Storage in window seat and island
WHAT CAN GO WRONG?
Having lived through 3 kitchen renovations, I can say it is one of the hardest projects to survive. There is a lot of dust, noise, disorganization, and I can almost guarantee that something will go wrong. This project seemed like it would be easy because our home was basically newish with everything up to code. Meaning electrical, plumbing, flooring, sheetrock, lighting etc. Our kitchen contractor would only do full gut renovation, meaning new walls and flooring to assure everything was level. We originally figured it would be a quick job. Tear out old cabinets and counters and replace with new in their place. This was not the case at all. Since we were repositioning the placement of the island and changing its shape we would have significant wood damage when they removed it. This was almost a deal breaker for us, however, we had some fading by our back slider in the family room so we decided to rip up the floors in both rooms and reinstall the same floor again. Crazy- I know! The first problem was our floors were discontinued! I won’t bore you with all the details but after many phone calls, we found a few distributors around the country that had some boxes available. The second problem is easier to understand if you see it with your own eyes. I can’t look!
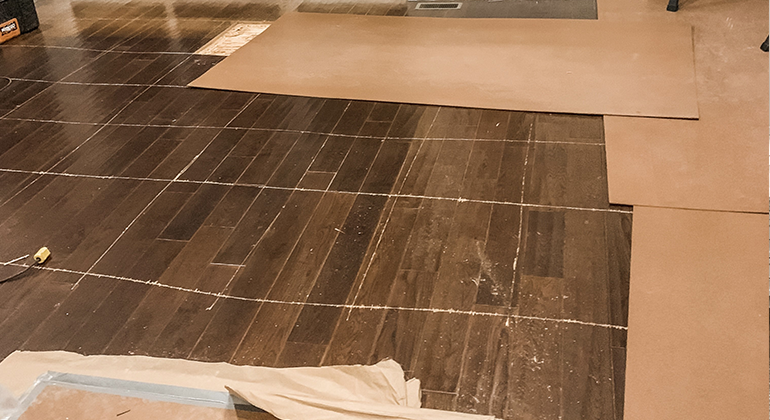
Floors were glued down

They ripped up subfloor with old floor-you could actually see into the basement

The dust bowl of 2020
IS THERE AN END IN SIGHT?
I have to say I have never seen a group of guys work so hard! Little by little they removed each plank (most splintering) and had to replace the subfloor before putting down the new floor. This was an added cost we didn’t account for. So keep in mind to always budget about 20 percent more than the estimated cost. The floor removal set the project back about a week and just when we got on track, the world shut down! I kid you not…insert the pandemic. When my husband called and told me his travel schedule for work was terminated until further notice-I knew this was serious. 2 days later, I was sent home from my classroom with no return date in sight. Shortly after, I got a robocall from my boy’s school with essentially the same message. The next few weeks became challenging with all four of us working/learning from home. We didn’t have a working kitchen or laundry room (yes we decided to remodel that as well). The contractors showed up only 1 or 2 at a time to respect social distancing rules and to maintain safety. From that point on we didn’t interact with them much and basically crossed our fingers and hoped for the best. We had some major hiccups along the next few weeks.
To sum it up, we ran out of wood and the installer had to work with some botched pieces that had to be laid due to the pandemic. The worst error was the island placement. This was not the contractor’s mistake but instead the mistake of the designer. His measurements were off considerably but not noticeably until everything was anchored and appliances installed. When opening the dishwasher you can’t fully open the refrigerator door and vice versa. I normally would have noticed an error of this size, however, due to the nature of the project and the world turned upside down-it was too late. We revisited it a year later and opted to leave well enough alone for fear of creating new problems. During the pandemic, I learned to be grateful for the life I had and appreciate how blessed I was to have a beautiful kitchen even with some minor flaws.


KITCHEN SOURCES
Kitchen Craft cabinetry in Alabaster white matte finish Lexington style
Caesarstone quartz countertop in Frosty Carina
Calacatta marble backsplash 3×6 from The Builder Depot
Top Knobs hardware Serene pulls and knobs and Transcend latches in honey bronze
Wolf 48″ 6 burner gas range with griddle and oven and a half
Sub-zero 36″ panel ready side by side refrigerator
Bosch 800 panel ready dishwasher
Sharp 24″ microwave drawer stainless steel
Luxeaire 45″ hood insert
Kohler Apron-Front Single-basin sink in enabled cast iron
Kohler Artifacts Faucet/Potholder polished chrome
Mohawk 5 in solid hardwood floor hand scraped in Barnstable Oak (discontinued)